If you utilize Microsoft Outlook, you will be familiar with OLM and PST files. Both are popular formats for users to handle critical information offered by Outlook. For either Mac or Windows users. Users save Mac Outlook data in OLM files, and they save a duplicate of Outlook data on the specified system in PST files. Sometimes customers wish to transition from Outlook for Mac to Outlook for Windows but are unable to do so for a variety of reasons, therefore let’s learn how to migrate from OLM to PST with attachments.
What exactly are OLM and PST files?
If you want to understand how to convert OLM to PST, you must first comprehend the function of OLM and PST files
OLM File: OLM files are utilized for storing crucial emails and data for MAC Outlook, such as contacts, calendars, tasks, notes, and so on. This file is only available for Mac users.
PST Files: PST is an abbreviation for Personal Storage Table. This file is used to hold calendars, events, contacts, and email messages. MS Outlook users make use of these files.
The Benefits of Converting OLM to PST
If you were given the duty of OLM and PST File, you must now comprehend why. There are various reasons to switch from OLM to PST, as shown below.
• When converting Outlook for Mac to Outlook for Windows, users wish to import OLM to PST.
• Users are aware that the OLM file is only available to Mac users. They must transform OLM files to another file if they wish to transmit Mac Outlook mailbox data to another place.
• Outlook for Windows is more recent. As a result, customers who want to transfer data from Outlook to Mac have additional options.
• Users have to change the OLM file to PST if they wish to access and administer both mailboxes at the same time and in the same location.
Methods for Converting OLM to PST
If you understand why you want to move from OLM to PST. You will now have access to all of the ways for transforming the process. There are two ways to convert an OLM file to a PST file. The first is the manual approach, while the second is the automated way.
Manually Switching an OLM to a PST File
The following are the procedures to take while manually transforming an OLM file to a PST file:
Step 1: To begin transferring OLM files to PST file format, you must first have your Gmail ID.
• Log in to your Gmail account using your email address and password.
• To activate the IMAP action, go to the settings Icon, forwarding, and POP tab.
• To save your changes, hit the tab.
• Open Outlook for Mac, go to Preferences, and then Accounts.
• Simply click the + symbol to create a new account and input your Gmail address.
• Enter your password and then press the action tab.
• Set up your email tab and select “Continual Access.”
• Then you’ll get a notification about your browser launching, and you’ll be prompted to sign in to Google.
• Submit your credentials once more and double-check your information.
• Click the Permit tab; a confirmation box will appear on the screen.
• Select the MS Outlook tab.
• When you reach the end of the procedure, click the Done button to see your Gmail account successfully connected to Mac Outlook.
Step 2: Now, in a few stages, we will upload OLM file data into the Email account:
• Start Mac Outlook on the desktop.
• Then Go to the left side to find the set Gmail ID.
• Drag and drop OLM file data into your Gmail ID and you will notice that you have completely migrated the data.
Step 3: Once these operations are completed, we must sync the same email account in Outlook for Windows, as seen below:
• To begin, launch Windows Outlook and select the file.
• Navigate to the Add Action option.
• Insert your email address and then click Connect.
• Then, input your password and click Connect once again.
• You will receive a notification indicating that the account has been successfully added.
• Then hit the done button.
Step 4: Complete the conversion of OLM emails saved in the Gmail account to PST format.
After adding your Gmail account to MS Outlook, open it and verify the data. Then, in the import/export action, navigate to the file and OLM for the open & and export.
• Click the next tab after selecting the file.
• Select the PST file and tab net switch, then click the Gmail ID holding the data from your OLM file and click next.
• Click the Browse tab to provide the path for the Output folder, and then click the Finish button.
• Click the browse tab to provide the path for the output folder, and then click the end button to complete the OLM to PST conversion process.
The Manual Approach Has Limitations.
When adopting a manual process, there will clearly be restrictions, and certain chances and hazards will have to be confronted throughout the operation.
Which is as follows: –
• The manual process is time-consuming and labor-intensive.
• During operations, no step may be skipped.
• This procedure is more complicated than others.
• Some stages need technical knowledge.
• You must accept the risk of data loss or removal.
• There is no assurance after your data has been lost.
• You can only move a certain number of mailboxes.
Convert OLM to PST Using Automation with Attachments
If you want a simple and risk-free method, you can utilize GainTools Mac OLM to PST Converter. This program is simple to use and allows you to import single or many OLM files to PST format. This program is simple to use and does not require any technical knowledge. It is simple to convert olm to pst.
The Advantages of Utilizing This Automated Tool:-
• After converting OLM to PST, you can utilize a new folder.
• This program converts single and numerous OLM files to Outlook PST files.
• This program transfers OLM to MBOX, PST, EML, EMLX, and other formats.
• This application aids in the detailed viewing of Outlook Mailbox Items before OLM to PST conversion.
• This utility works well in all Mac editions, and exported PST files work well in Outlook editions such as 2021, 2019, 2016, 2010, and so on.
The Method of Using an OLM to PST Converter
To convert OLM to PST, you must follow the procedures outlined below.
• First, download and execute the OLM Converter utility.
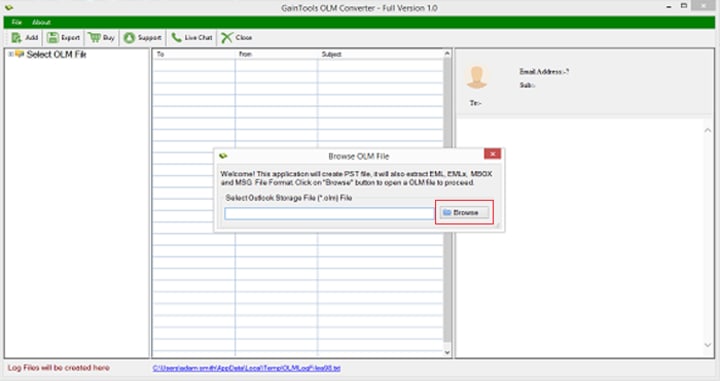
• Click next after selecting the single files to browse OLM files.
• Scan the selected olm files and show live Preview
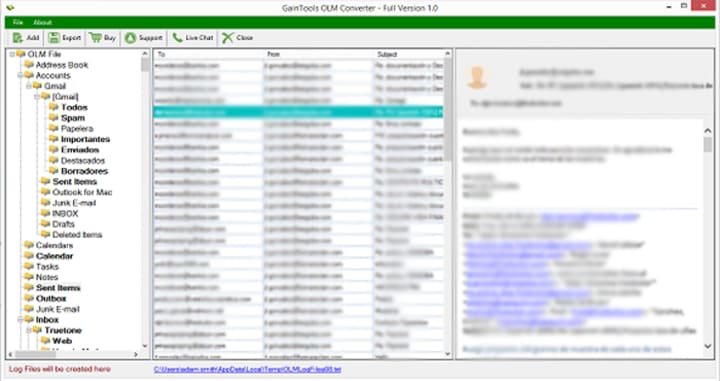
• Select Outlook PST as the saving format, then go to the crucial features and specify the destination path.
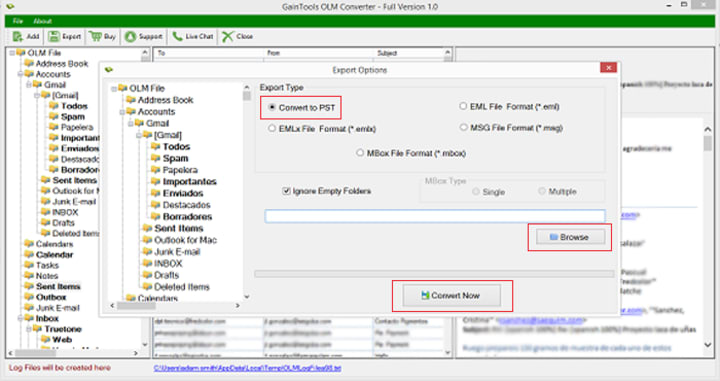
• Choose the location where you want the OLM file data to be converted.
• Then pick the OLM to PST Conversion option.
Conclusion
I hope this essay has helped you understand the manual process for converting OLM to PST format in a few simple stages. And an automated tool approach that processes everything for you. It is now up to you whether to choose a manual or automated technique to convert your OLM file to PST format. I believe that using an automated solution will improve your experience with the manual approach.